2014年看到的好书

简单总结:

iOS应用逆向工程:分析与实战

很好的一本关于iOS逆向实战的手册。

iOS 8 day by day

一如既往,质量有保证,一本非常好的了解iOS8的书。

swift编程语言入门

苹果推出了新的编程语言swift,未来大有可为。

百年孤独

很多年后,面对行刑队,奥雷里亚诺·布恩迪亚上校将会回想起父亲带他去见识冰块的那个遥远的下午。

2014年,马尔克斯离我们而去!

霍乱时期的爱情故事

看过之后,关于爱情,更加疑惑…

解忧杂货铺

东野圭吾还算及格的一部作品,多了一些关怀。喜欢那个鱼店音乐人。

你对音乐的执着追求,绝不是白白付出。
我相信,将会有人因为你的歌而得到救赎。你创作的音乐也必将流传下去。

第七日

余华的一如既往的风格。

在细雨中呼喊

仍然是余华的作品,关于人生的故事,让人不禁唏嘘。

没用一条路是重复的

喜欢上一个作家,就会喜欢上他的随笔,想了解关于他更多的故事。

2014看到的烂书

疾风回旋曲

东野圭吾的小说,完全没有了以往的水准。纸张也烂的出奇,腰封的宣传语更是不要脸。

2014年看到的好电影

简单总结:

秦时明月之龙腾万里

国产动画片里上乘之作。参加了电影的杭州首映,看到了沈乐平导演,领了周边。

等一个人咖啡

2014年期望最高的一部电影,没有之一。大学的时候,在最难熬的一段时间看的电子版,成为那段时间唯一美好的回忆。这段经历也让这本小说对于我来说有了特殊的意义。后来特意买了书收藏。得知要拍成电影非常高兴。

But!!!

在不断美好的期望中,没有等来那个人。

电影版改编的让人很难接受,破坏了原作在我心中的美好想象。

如果没有之前的经历,应该会把它归入烂片吧。

安德的游戏 星际穿越

两部不错的科幻电影,可惜里面的科幻元素并不新奇。

智取威虎山

小时候开始就非常喜欢的一个故事,杨子荣更是心目中的偶像。

看个热闹!

亲爱的

2014年最特别的一部电影,无关乎电影名称,无关乎电影内容….

心花路放

在最错误的时间去看了这部电影。

2014年看的唯一一部喜剧电影,还算及格。

蓝色骨头

喜欢老崔,文艺电影有着不同的感觉。《鱼鸟之恋》《迷失的季节》《蓝色骨头》,三首歌串联起整个剧情。

值得一提的,这是我第一个在电影院从头到尾完整看完的一部电影。

醉乡民谣

如果一种东西,既不是新出来的,也没有过时,那它一定是民谣。

2014年看到的烂电影

简单总结:

变形金刚4绝迹重生

看着看着快睡着了,电影的声音太吵了!

最近在使用MSWeakTimer的时候,出现了crash的情况,在分析过程中发现了自己之前一直忽略的一些内容,简单做一下记录。

ps:后来在网上查到了两篇文章,很好的解释了这个问题。

http://blog.sunnyxx.com/2015/01/17/self-in-arc/

http://blog.sunnyxx.com/2014/10/15/behind-autorelease/

crash过程跟踪

ARC的工程,大致的调用代码如下:

// ...
// @property (nonatomic, strong) MSWeakTimer *countdownTimer;
// ...
_countdownTimer = [MSWeakTimer scheduledTimerWithTimeInterval:1.0
                                                       target:self
                                                     selector:@selector(timerCountDown:)
                                                     userInfo:nil
                                                      repeats:YES dispatchQueue:dispatch_get_main_queue()];
[_countdownTimer fire];

... 

- (void)timerCountDown:(MSWeakTimer *)timer{
    // ...
    if(shouldDisableTimer){
        [timer invalidate];
        timer = nil;
    }else{
        // ...
    }
}

最终崩溃的函数:

- (void)timerFired
{
    // Checking attomatically if the timer has already been invalidated.
    if (OSAtomicAnd32OrigBarrier(1, &_timerFlags.timerIsInvalidated))
    {
        return;
    }

    // We're not worried about this warning because the selector we're calling doesn't return a +1 object.
    #pragma clang diagnostic push
    #pragma clang diagnostic ignored "-Warc-performSelector-leaks"
        [self.target performSelector:self.selector withObject:self];
    #pragma clang diagnostic pop

    if (!self.repeats)
    {
        [self invalidate];
    }
}

崩溃在了if (!strongSelf.repeats)这一句,显示self已经是zombie对象。

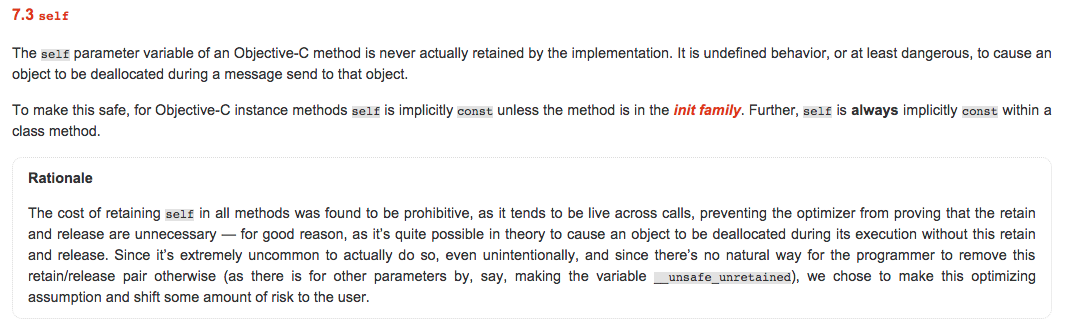
断点跟踪发现,在selector中,self被置为nil。那就比较奇怪,拿到self不会在作用域范围内retaincount加1吗?

crash原因分析

根据oc的调用机制,第一个参数就是self,但是self作为参数,并不会增加引用计数。这样就解释了上面self为什么成为zombie。

具体的解释可以参照Clang 3.7 documentation,解释如下图:
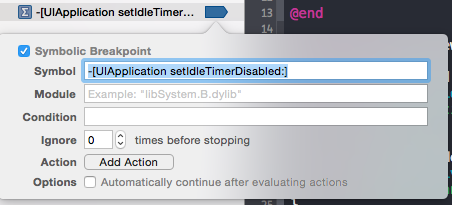
Clang3.7#self

如何解决crash

通过增加一个对self的强引用,保证在函数作用域内,self不会被释放。

- (void)timerFired
{
    // Checking attomatically if the timer has already been invalidated.
    if (OSAtomicAnd32OrigBarrier(1, &_timerFlags.timerIsInvalidated))
    {
        return;
    }

    MSWeakTimer *strongSelf = self;
    // We're not worried about this warning because the selector we're calling doesn't return a +1 object.
    #pragma clang diagnostic push
    #pragma clang diagnostic ignored "-Warc-performSelector-leaks"
        [self.target performSelector:self.selector withObject:self];
    #pragma clang diagnostic pop

    if (!strongSelf.repeats)
    {
        [strongSelf invalidate];
    }
}

深入理解ARC下的Autorelease

到这里就结束了吗?有意思的在后面!

在不修改MSWeakTimer的情况下,如果将上面的代码:

[_countdownTimer fire];

改为:

[self.countdownTimer fire];

运行后就不会崩溃!!!

WTF

关于Autorelease,下面的内容摘自http://blog.sunnyxx.com/2014/10/15/behind-autorelease/

AutoreleasePoolPage

ARC下,我们使用@autoreleasepool{}来使用一个AutoreleasePool,随后编译器将其改写成下面的样子:

void *context = objc_autoreleasePoolPush();
// {}中的代码
objc_autoreleasePoolPop(context);

而这两个函数都是对AutoreleasePoolPage的简单封装,所以自动释放机制的核心就在于这个类。

AutoreleasePoolPage是一个C++实现的类:

AutoreleasePoolPage

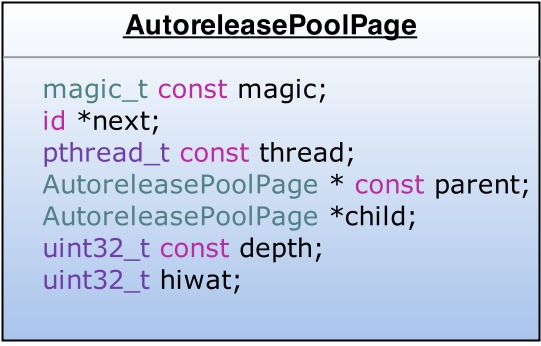
  • AutoreleasePool并没有单独的结构,而是由若干个AutoreleasePoolPage以双向链表的形式组合而成(分别对应结构中的parent指针和child指针)
  • AutoreleasePool是按线程一一对应的(结构中的thread指针指向当前线程)
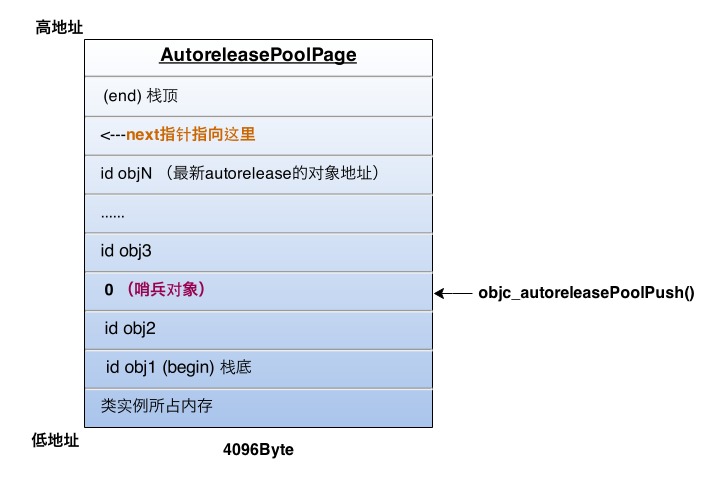
  • AutoreleasePoolPage每个对象会开辟4096字节内存(也就是虚拟内存一页的大小),除了上面的实例变量所占空间,剩下的空间全部用来储存autorelease对象的地址
  • 上面的id *next指针作为游标指向栈顶最新add进来的autorelease对象的下一个位置
  • 一个AutoreleasePoolPage的空间被占满时,会新建一个AutoreleasePoolPage对象,连接链表,后来的autorelease对象在新的page加入

所以,若当前线程中只有一个AutoreleasePoolPage对象,并记录了很多autorelease对象地址时内存如下图:

AutoreleasePoolPage

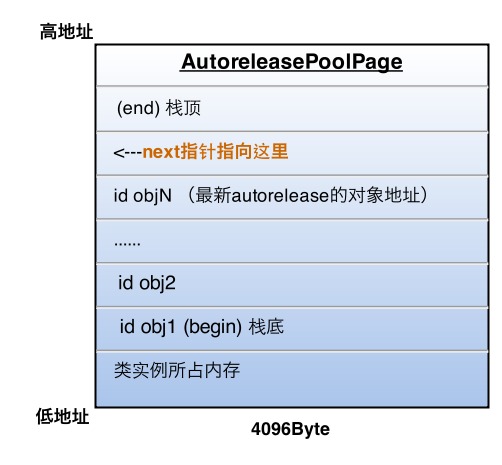
图中的情况,这一页再加入一个autorelease对象就要满了(也就是next指针马上指向栈顶),这时就要执行上面说的操作,建立下一页page对象,与这一页链表连接完成后,新page的next指针被初始化在栈底(begin的位置),然后继续向栈顶添加新对象。

所以,向一个对象发送- autorelease消息,就是将这个对象加入到当前AutoreleasePoolPage的栈顶next指针指向的位置。

释放时刻

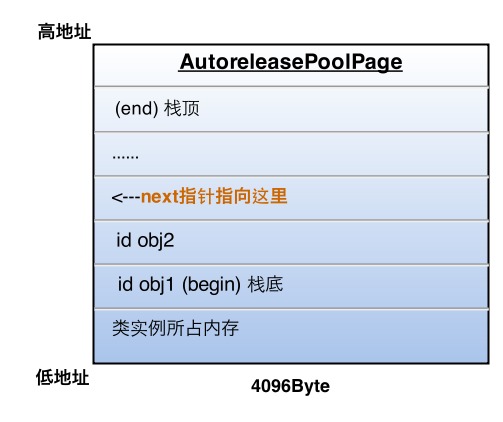
每当进行一次objc_autoreleasePoolPush调用时,runtime向当前的AutoreleasePoolPage中add进一个哨兵对象,值为0(也就是个nil),那么这一个page就变成了下面的样子:

AutoreleasePoolPage

objc_autoreleasePoolPush的返回值正是这个哨兵对象的地址,被objc_autoreleasePoolPop(哨兵对象)作为入参,于是:

  1. 根据传入的哨兵对象地址找到哨兵对象所处的page;
  2. 在当前page中,将晚于哨兵对象插入的所有autorelease对象都发送一次- release消息,并向回移动next指针到正确位置;
  3. 补充2:从最新加入的对象一直向前清理,可以向前跨越若干个page,直到哨兵所在的page 刚才的objc_autoreleasePoolPop执行后,最终变成了下面的样子:

AutoreleasePoolPage

嵌套的AutoreleasePool

知道了上面的原理,嵌套的AutoreleasePool就非常简单了,pop的时候总会释放到上次push的位置为止,多层的pool就是多个哨兵对象而已,就像剥洋葱一样,每次一层,互不影响。

Autorelease返回值的快速释放机制

值得一提的是,ARC下,runtime有一套对autorelease返回值的优化策略。 比如一个工厂方法:

+ (instancetype)createSark {
    return [self new]; 
}
// caller
Sark *sark = [Sark createSark];

秉着谁创建谁释放的原则,返回值需要是一个autorelease对象才能配合调用方正确管理内存,于是乎编译器改写成了形如下面的代码:

+ (instancetype)createSark {
    id tmp = [self new];
    return objc_autoreleaseReturnValue(tmp); // 代替我们调用autorelease
}
// caller
id tmp = objc_retainAutoreleasedReturnValue([Sark createSark]) // 代替我们调用retain
Sark *sark = tmp;
objc_storeStrong(&sark, nil); // 相当于代替我们调用了release

一切看上去都很好,不过既然编译器知道了这么多信息,干嘛还要劳烦autorelease这个开销不小的机制呢?于是乎,runtime使用了一些黑魔法将这个问题解决了。

黑魔法之Thread Local Storage

Thread Local Storage(TLS)线程局部存储,目的很简单,将一块内存作为某个线程专有的存储,以key-value的形式进行读写,比如在非arm架构下,使用pthread提供的方法实现:

void* pthread_getspecific(pthread_key_t);
int pthread_setspecific(pthread_key_t , const void *);

说它是黑魔法可能被懂pthread的笑话- –

在返回值身上调用objc_autoreleaseReturnValue方法时,runtime将这个返回值object储存在TLS中,然后直接返回这个object(不调用autorelease);同时,在外部接收这个返回值的objc_retainAutoreleasedReturnValue里,发现TLS中正好存了这个对象,那么直接返回这个object(不调用retain)。

于是乎,调用方和被调方利用TLS做中转,很有默契的免去了对返回值的内存管理。

于是问题又来了,假如被调方和主调方只有一边是ARC环境编译的该咋办?(比如我们在ARC环境下用了非ARC编译的第三方库,或者反之)只能动用更高级的黑魔法。

黑魔法之__builtin_return_address

这个内建函数原型是char *__builtin_return_address(int level),作用是得到函数的返回地址,参数表示层数,如__builtin_return_address(0)表示当前函数体返回地址,传1是调用这个函数的外层函数的返回值地址,以此类推。

- (int)foo {
    NSLog(@"%p", __builtin_return_address(0)); // 根据这个地址能找到下面ret的地址
    return 1;
}
// caller
int ret = [sark foo];

看上去也没啥厉害的,不过要知道,函数的返回值地址,也就对应着调用者结束这次调用的地址(或者相差某个固定的偏移量,根据编译器决定)

也就是说,被调用的函数也有翻身做地主的机会了,可以反过来对主调方干点坏事。

回到上面的问题,如果一个函数返回前知道调用方是ARC还是非ARC,就有机会对于不同情况做不同的处理。

黑魔法之反查汇编指令

通过上面的__builtin_return_address加某些偏移量,被调方可以定位到主调方在返回值后面的汇编指令

// caller 
int ret = [sark foo];
// 内存中接下来的汇编指令(x86,我不懂汇编,瞎写的)
movq ??? ???
callq ???

而这些汇编指令在内存中的值是固定的,比如movq对应着0x48。

于是乎,就有了下面的这个函数,入参是调用方__builtin_return_address传入值。

static bool callerAcceptsFastAutorelease(const void * const ra0) {
    const uint8_t *ra1 = (const uint8_t *)ra0;
    const uint16_t *ra2;
    const uint32_t *ra4 = (const uint32_t *)ra1;
    const void **sym;
    // 48 89 c7    movq  %rax,%rdi
    // e8          callq symbol
    if (*ra4 != 0xe8c78948) {
        return false;
    }
    ra1 += (long)*(const int32_t *)(ra1 + 4) + 8l;
    ra2 = (const uint16_t *)ra1;
    // ff 25       jmpq *symbol@DYLDMAGIC(%rip)
    if (*ra2 != 0x25ff) {
        return false;
    }
    ra1 += 6l + (long)*(const int32_t *)(ra1 + 2);
    sym = (const void **)ra1;
    if (*sym != objc_retainAutoreleasedReturnValue)
    {
        return false;
    }
    return true;
}

它检验了主调方在返回值之后是否紧接着调用了`objc_retainAutoreleasedReturnValue`,如果是,就知道了外部是ARC环境,反之就走没被优化的老逻辑。

其他Autorelease相关知识点

使用容器的block版本的枚举器时,内部会自动添加一个AutoreleasePool:

[array enumerateObjectsUsingBlock:^(id obj, NSUInteger idx, BOOL *stop) {
    // 这里被一个局部@autoreleasepool包围着
}];

当然,在普通for循环和for in循环中没有,所以,还是新版的block版本枚举器更加方便。for循环中遍历产生大量autorelease变量时,就需要手加局部AutoreleasePool。

以上一段转载自sunnyxx的文章!

解答最后的问题

根据上面的分析,可以知道,当执行:

[self.countdownTimer fire];

Autorelease为我们做了:

id tmp = objc_retainAutoreleasedReturnValue([Sark createSark]) // 代替我们调用retain
MSWeakTimer *timer = tmp;
[timer fire];
objc_storeStrong(&timer, nil); // 相当于代替我们调用了release

参考资料:

http://clang.llvm.org/docs/AutomaticReferenceCounting.html

http://blog.sunnyxx.com/2014/10/15/behind-autorelease/

fishhook: A library that enables dynamically rebinding symbols in Mach-O binaries running on iOS.

#import <dlfcn.h>
#import "fishhook.h"

static OSStatus (*origin_AudioSessionSetProperty)(unsigned long, unsigned long, const void*);

void save_original_symbols() {
    origin_AudioSessionSetProperty = dlsym(RTLD_DEFAULT, "AudioSessionSetProperty");
}

OSStatus my_AudioSessionSetProperty(unsigned long inID, unsigned long inDataSize, const void *inData){
    printf("Calling real AudioSessionSetProperty: inID %ld  \n", inID);

    return origin_AudioSessionSetProperty(inID, inDataSize, inData);
}

int main(int argc, char * argv[]) {
 @autoreleasepool {
       save_original_symbols();
       rebind_symbols((struct rebinding[])AudioSessionSetProperty, 1);

       return UIApplicationMain(argc, argv, nil, NSStringFromClass([AppDelegate class]));
     }
}

Aspects

Aspects: Delightful, simple library for aspect oriented programming.

[[AVAudioSession sharedInstance] aspect_hookSelector:@selector(setCategory:withOptions:error:) withOptions:0 usingBlock:^(id<AspectInfo> info,NSString *category, AVAudioSessionCategoryOptions option, NSError ** error){
    NSLog(@"AVAudioSession set category with category : %@", category);
}error:nil];

需要注意的一点,参数block需要与hook的函数相符,如果不匹配,会有如下提示:

Aspects: Block signature <NSMethodSignature: 0x7f93b8c35c80> doesn't match <NSMethodSignature: 0x7f93b8c33c30>.

dispatch_get_current_queue从iOS6.0开始被废弃掉,在《Effective Object-C 2.0》中,也单独有一个章节讲解。在队列同步操作的时候,有时需要检查当前的执行队列。在试图使用dispatch_get_current_queue判断当前队列的时候,仍然可能出错。

使用dispatch_get_current_queue()存在的问题

先看下面一段代码:

    dispatch_queue_t queueA = dispatch_queue_create("c.b.a", NULL);
    dispatch_queue_t queueB = dispatch_queue_create("c.b.b", NULL);
    dispatch_sync(queueA, ^{
       dispatch_sync(queueB, ^{
           dispatch_block_t block = ^{
              // ...
           };
           dispatch_sync(queueA, ^{
               block();
           });
       });
    });

运行会发现死锁的情况,尝试使用dispatch_get_current_queue()来解决:

dispatch_sync(queueA, ^{
           dispatch_sync(queueB, ^{
               dispatch_block_t block = ^{
                  // ...
               };
               if(dispatch_get_current_queue() == queueA){
                   block();
               }else{
                   dispatch_sync(queueA, ^{
                       block();
                   });
               }
           });
        });

运行后发现,同样会死锁。dispatch_get_current_queue判断,当前队列为queueB。

如果把每个队列看做一个管道,将管道B放在管道A中,dispatch_get_current_queue只能看到自己这一层,没法打破管道。

dispatch_get_specific()试一试

尝试使用dispatch_get_specific()关联键值对的方式判断当前队列:

    dispatch_queue_t queueA = dispatch_queue_create("c.b.a", NULL);
    dispatch_queue_t queueB = dispatch_queue_create("c.b.b", NULL);
    static int kQueueSpecificA;
    static int kQueueSpecificB;
    dispatch_queue_set_specific(queueA, &kQueueSpecificA, (void *)CFSTR("queueA"), (dispatch_function_t)CFRelease);
    dispatch_queue_set_specific(queueB, &kQueueSpecificB, (void *)CFSTR("queueB"), (dispatch_function_t)CFRelease);
    dispatch_sync(queueA, ^{
       dispatch_sync(queueB, ^{
           dispatch_block_t block = ^{
              // ...
           };
           void *retrievedValueA = dispatch_get_specific(&kQueueSpecificA);
           void *retrievedValueB = dispatch_get_specific(&kQueueSpecificB);
           if(retrievedValueA){
                NSLog(@"queueA");
           }
           if(retrievedValueB){
                NSLog(@"queueB");
           }
           if(retrievedValueA){
               block();
           }else{
               dispatch_sync(queueA, ^{
                        block();
                    });
           }
       });
    });

运行之后,发现仍然有问题。dispatch_get_specific()仍然无法破壁,窥视外面的管道。

破壁还需dispatch_set_target_queue()

dispatch_set_target_queue()将第一个参数指定在第二个参数的队列内执行,同时也使参数A的队列优先级与参数B的队列相同。

dispatch_queue_t queueA = dispatch_queue_create("c.b.a", NULL);
    dispatch_queue_t queueB = dispatch_queue_create("c.b.b", NULL);
    static int kQueueSpecificA;
    static int kQueueSpecificB;
    dispatch_queue_set_specific(queueA, &kQueueSpecificA, (void *)CFSTR("queueA"), (dispatch_function_t)CFRelease);
    dispatch_queue_set_specific(queueB, &kQueueSpecificB, (void *)CFSTR("queueB"), (dispatch_function_t)CFRelease);
    dispatch_set_target_queue(queueB, queueA);
        dispatch_sync(queueB, ^{
            dispatch_block_t block = ^{
                // ...
            };
            void *retrievedValueA = dispatch_get_specific(&kQueueSpecificA);
            void *retrievedValueB = dispatch_get_specific(&kQueueSpecificB);
            if(retrievedValueA){
                NSLog(@"queueA");
            }
            if(retrievedValueB){
                NSLog(@"queueB");
            }
            if(retrievedValueA){
                block();
            }else{
                dispatch_sync(queueA, ^{
                    block();
                });
            }
        });

这样执行的结果就没有问题了~

dispatch_set_target_queue()注意的问题

执行上面的代码会发现,retrievedValueAretrievedValueB都不为空。是的,这两个管道已经互通状态了!所以在使用的时候,判断的时候也需要注意。

安装cocoapods

gem update --system
gem sources -l
gem install cocoapods
pod setup

创建私有cocoapods repo

第一步,创建私有Spec Repo

在服务器创建repo裸仓库:

mkdir REPO_NAME.git
cd REPO_NAME.git
git init --bare

第二步,将私有pod repo添加到本地

pod repo list
pod repo add REPO_NAME SOURCE_URL

第三步,检测pod repo是否正确

pod repo lint REPO_NAME

为私有pod添加新的Spec

第一步,创建podspec文件

pod spec create SPEC_NAME

第二步,修改Spec文件

第三步,检测Spec文件是否正确

pod spec lint SPEC_NAME

第四步,上传Spec文件至私有pod repo

pod repo push REPO_NAME SPEC_NAME.podspec

因为我使用的时sshURL获取,会产生warning

    - WARN  | [source] Git SSH URLs will NOT work for people behind firewalls configured to only allow HTTP, therefore HTTPS is preferred.

可以忽略这个警告:

pod repo push --allow-warnings REPO_NAME SPEC_NAME.podspec

spec lint 技巧

在执行pod spec line xxx的时候出错,但提示往往比较简单,可以添加参数--no-clean

pod spec lint --no-clean xxx

执行完成后,根据提示的路径,打开lint生成的工程文件,编译查看出错的原因。

一般路径为:/private/tmp/CocoaPods/Lint/Pods/Pods.xcodeproj

参考链接:http://guides.cocoapods.org/making/private-cocoapods.html

应用集成了cocoapods一段时间,发现每次执行pod insgtall命令都会比较慢,有时要等十多分钟甚至更久,严重影响工作效率和开发的心情。

pod install执行慢的原因

Cocopods的pod install命令一般分两步:

  1. 执行pod repo update,更新本地的repo Spec文件(https://github.com/CocoaPods/Specs.git
  2. 根据spec的配置,获取源文件,一般是通过git clone的方式从github上下载第三方库

由于GWF的存在,经常存在github无法访问的情况;有时可以访问,速度也比较慢。人生苦短!!

可以针对这两方面进行提高pod install执行速度。

减少pod repo update的次数

执行pod repo update是必要的,保证每次安装的时候,能够获取最新的Spec文件。但不必每次都执行,建议每天执行一次。在执行pod install的时候添加参数,不再执行pod repo update

pod install --no-repo-update

使用本地的git mirror解决下载慢的问题

解决了repo更新的问题,仍然存在一系列问题:

  • 将源文件克隆到本地速度缓慢
  • 一旦被托管在github上的第三方库被删除掉,我们将再也无法获取到第三方库
  • 如果访问外网的网络暂时性的中断,无法执行pod install,影响正常开发

为了解决以上问题,在公共服务器上搭建了一个GitMirror,为每一个使用到的第三方库创建一个mirror仓库。以后每次执行install的时候,实际都是从本地服务器下载,速度就会有明显的提升。

修改本地spec配置

第一步要将第三库的源文件下载地址修改为本地服务器。写了一个脚本moveToGitMirror.py自动完成本地spec配置修改。执行命令如下:

cd ~/.cocoapods/repos/master/
python moveToGitMirror.py

这个脚本的功能很简单,遍历当前目录下的文件,查找后缀名为.spec.json的文件,查找到source路径,然后修改为镜像地址。

这里需要注意的是,一旦修改,将完全依赖镜像的服务器。可以替换成一个指定的域名,而不是一个固定的ip地址。这样通过修改本地hosts文件,实现source路径的整体切换。

为一个第三方库创建git mirror

如果项目中需要一个第三方库,以Masonry为例。

ssh root@xx.xx.xx.xx
cd GitRepoMirror/
git clone --mirror https://github.com/Masonry/Masonry.git

设置免密码远程访问

完成以上的操作,执行pod install,会发现下载一个第三方库都需要我们输入一次密码。what???太烦了!

为了实现免密码远程访问,我们需要把本机的rsa公钥放入远程服务器的authorized_keys文件下。如果本机没有生产过rsa密钥,执行以下命令:

ssh-keygen -t rsa -C "xxx.com"

下一步

下一步,可以创建一个属于自己的私有pod repo了,以后再介绍。

前一段时间,遇到了一个奇怪的问题:在程序里设置了idleTimerDisabledYES,但是还是有用户反馈,程序会自动锁屏。测试也曾反馈,曾经遇到过这个问题,但一直未找到重现方法。在Stackoverflow看到,与UIImagePickerController的使用有关。

重现

设置idleTimerDisabledYES,创建UIImagePickerController,设置sourceType为UIImagePickerControllerSourceTypeCamera,然后弹出拍照页面。拍照页面关闭后,等待自动锁屏的出现。

分析

设置断点:

-[UIApplication setIdleTimerDisabled:]

idleTimer breakpoint

运行后会发现,在UIImagePickerController弹出的时候,进入一次断点。使用LLDB命令(因为我用的是arm64的机器,所以寄存器为x,如果是armv7,为r):

po $x0
<UIApplication: 0x156e008e0>

p (SEL)$x1
(SEL) $1 = "setIdleTimerDisabled:"

po $x2
1

在弹出UIImagePickerController的时候,系统会自动将idleTimerDisabled设置为YES

继续运行,关闭UIImagePickerController,由于这只的animation为YES,会进入两次断点。两次的参数相同,都为nil

po $x2
nil

这就会将idleTimerDisabled设置为NO,导致之前设置的值被修改。

解决

目前想到的解决方法,在UIImagePickerController消失后,重新设置idleTimerDisabled为需要的值。

#pragma mark - UIImagePickerControllerDelegate

- (void)imagePickerController:(UIImagePickerController *)picker         didFinishPickingMediaWithInfo:(NSDictionary *)info
{
    [self dismissViewControllerAnimated:YES completion:^{
    [self performSelector:@selector(resetIdleTimerDisabled) withObject:nil          afterDelay:1.0];
     }];
}

- (void)imagePickerControllerDidCancel:(UIImagePickerController *)picker
{
  [self dismissViewControllerAnimated:YES completion:^{
  [self performSelector:@selector(resetIdleTimerDisabled) withObject:nil        afterDelay:1.0];
   }];
}

参考:

http://stackoverflow.com/questions/23391564/ios-idletimerdisabled-yes-works-only-until-imagepicker-was-used

http://www.objc.io/issue-19/

前天苹果更新新版桌面操作系统OS X Yosemite,版本号为OS X 10.10。兴匆匆地升级我的Mac book,等了好久,更新重启之后出现了下面这个画面:

OooppP

解决方法很简单:

  • 第一步:长按关机键,然后重新启动,同时一直按住alt
  • 第二步:在出现的界面选择无线网络,并成功连接
  • 第三部:按commandr,进入网络恢复模式

经过N久的等待,终于又恢复正常了,开始体验新的OS X —— Yosemite!

Level3地址:http://www.pythonchallenge.com/pc/def/equality.html

分析

提示文字:

One small letter, surrounded by EXACTLY three big bodyguards on each of its sides.

根据上一次的经验,查看网页的源码,标题为re,看来和正则表达式有关系了。

网页源码里仍然有一段被注释的字符串,看来就要在这一串中找出两边大写中间小写字母的内容了。

解决

text = ‘’’
       …
       ‘’’
import re
pattern = re.compile(r'[A-Z]{3}([a-z])[A-Z]{3}')
result = re.findall(pattern,text)
print(‘’.join(result))

发现打印出来很多结果,哪里出了问题?

再仔细看提示语:EXACTLY,必须是有且只有三个大写字母。

修改正则表达式:

pattern = re.compile(r'[^A-Z][A-Z]{3}([a-z])[A-Z]{3}[^A-Z]')

输出:

linkedlist

其他解决方法

http://www.pythonchallenge.com/pcc/def/linkedlist.php