IOS7 New Feature: TextKit
引子
今年的WWDC大会上,苹果推出了IOS7,UI上有了很大变化,向扁平化发展;在新的SDK中,新的特性、新的功能无疑给开发者带来了更大的惊喜。其中最感兴趣的主要有三点,今天的主角TextKit就是其中之一。
What is Text Kit?
- 快速现代化的文本布局和渲染引擎
- 基于core text,拥有core text的所有功能和灵活性,而不需要使用不易用的API(CF type)
- 完美地集成在UIKit中
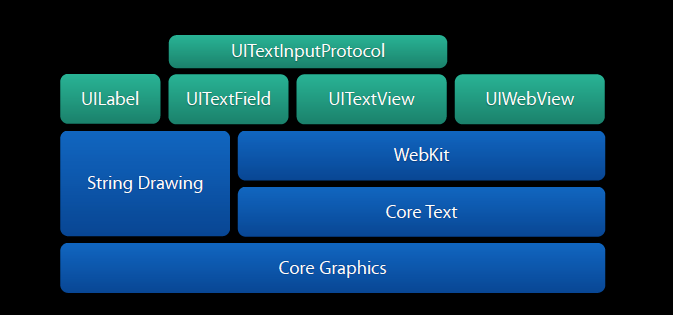
下图是IOS6中的类结构图:
下图是IOS7中的类结构图:
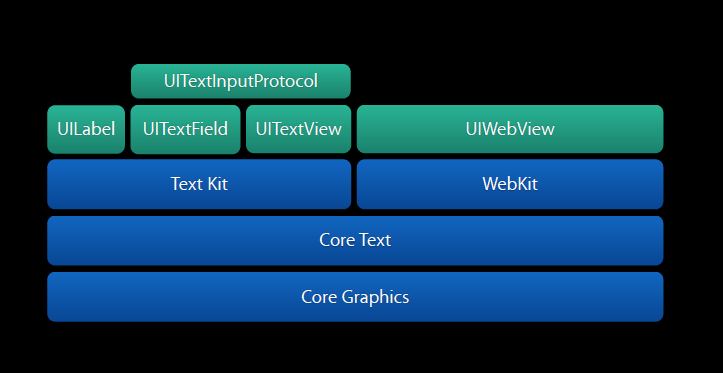
可以看出,iOS7之前,几乎所有的文本和UIWebview都是WebKit来处理的,由它来布局和渲染。在IOS7中,UIWebview还是由WebKit作为排版和渲染引擎,但是文本都由TextKit来处理,TextKit又是基于CoreText之上,这是一个很大的改动。
TextKit结构设计
TextKit的设计符合模型-视图-控制器(MVC)架构:
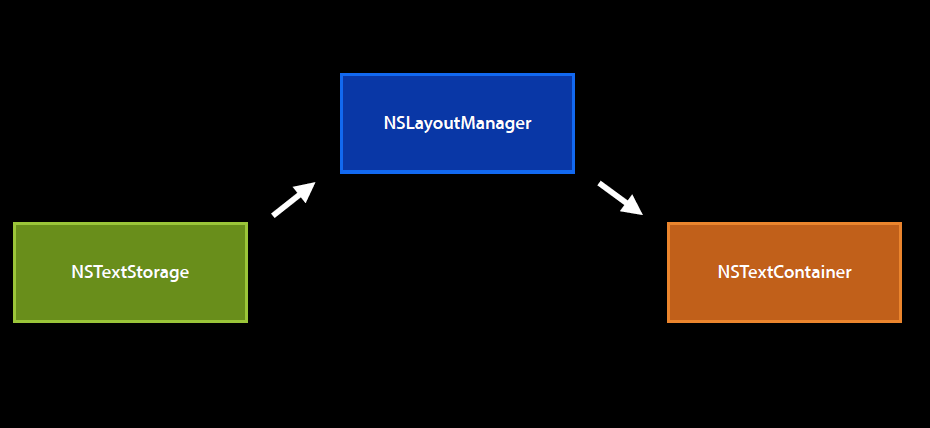
NSTextStorage:MVC中的模型,用于存储需要显示的文本内容以及他们的属性。它继承自NSMutableAttributedString。当内容变化时,会通知NSLayoutManager;
NSTextContainer:MVC中的视图。每个文本视图都有一个文本容器,用来定义了一个文本可以绘制的区域,即NSTextContainer。
UITextView:实际中的文本视图组件,每一文本视图都有一个文本容器,即NSTextContainer。
NSLayoutManager:MVC中的控制器,用来管理文本的显示:
- 这个管理器监听NSTextStorage中文本或属性改变的通知,一旦接收到通知就触发布局进程;
- 从NSTextStorage提供的文本开始,它将所有的字符翻译为字形(Glyph);
- 一旦字形全部生成,这个管理器向它的文本容器(们)查询文本可用以绘制的区域;
- 然后这些区域被行逐步填充,而行又被字形逐步填充。一旦一行填充完毕,下一行开始填充;
- 对于每一行,布局管理器必须考虑断行行为(放不下的单词必须移到下一行)、连字符、内联的图像附件等等;
- 当布局完成,文本的当前显示状态被设为无效,然后文本管理器将前面几步排版好的文本设给文本视图。
Text Layout
什么是TextLayout?
TextLayout = Glyph + Location
Glyph = Font + String
什么是Glyph?

- 字符的图形表示(A Graphical Representation of Characters)。
- Character + font –> glyph
- 图形系统的Glyph IDs: CGGlyph
有了TextLayout可以实现的功能:
1.字距调整(Kerning)
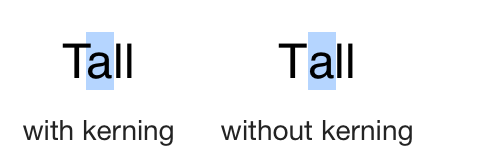
2.连写

3.断字

4.隐藏文字

5.更加完美的排版
DEMO演示
下载地址:Demo地址
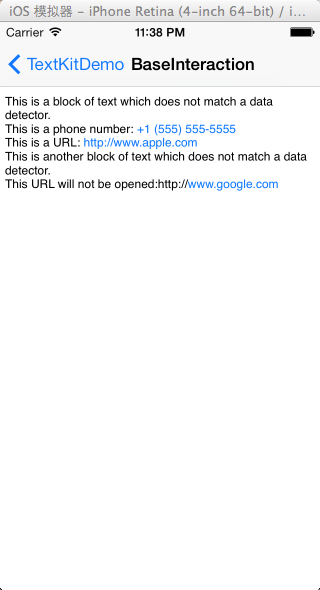
Demo1:BaseInteraction
对文本内容进行基本的检测,包括地址、电话、URl等。
-(BOOL) textView:(UITextView *)textView shouldInteractWithURL:(NSURL *)URL inRange:(NSRange)characterRange
{
    //...
}
通过回调函数,对URL的点击进行处理。
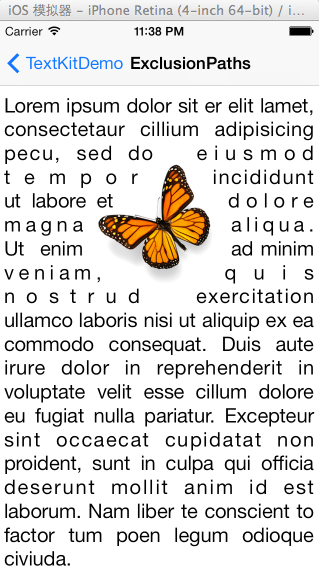
Demo2:ExclusionPaths
为TextView中的文字设置ExclusionPaths,即设置一个不可填充文本的区域。
- (UIBezierPath *)translatedBezierPath
{
    static dispatch_once_t onceToken;
    dispatch_once(&onceToken, ^{
        //从预先设置好的plist中读取
        _originalButterflyPath = [NSKeyedUnarchiver unarchiveObjectWithFile:[[NSBundle mainBundle] pathForResource:@"butterflyPath" ofType:@"plist"]];
    });

    CGRect butterflyImageRect = [self.textView convertRect:self.imageView.frame fromView:self.view];
    UIBezierPath *newButterflyPath = [self.originalButterflyPath copy];
    [newButterflyPath applyTransform:CGAffineTransformMakeTranslation(butterflyImageRect.origin.x, butterflyImageRect.origin.y)];

    return newButterflyPath;
}

- (void)viewDidLayoutSubviews
{
    [super viewDidLayoutSubviews];

    self.textView.textContainer.exclusionPaths = @[[self translatedBezierPath]];
}
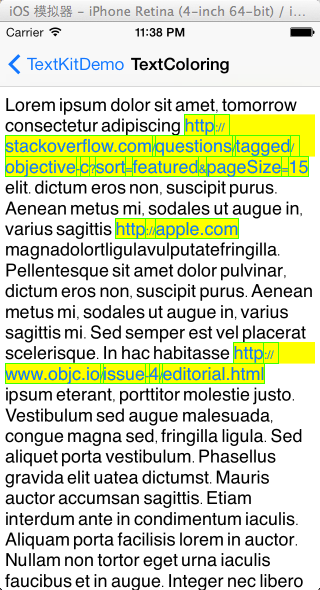
Demo3:TextColoring
实现对文本特殊字段的高亮处理,对URL类型字符串添加边框等。
self.textStorage = [[TextColoringTextStorage alloc] init];
OutliningLayoutManager* layoutManager = [[OutliningLayoutManager alloc] init];
NSTextContainer* textContainer = [[NSTextContainer alloc] initWithSize:CGSizeMake(self.view.frame.size.width, CGFLOAT_MAX)];
[layoutManager addTextContainer:textContainer];
[self.textStorage addLayoutManager:layoutManager];

UITextView* textView = [[UITextView alloc] initWithFrame:CGRectMake(0, 0, self.view.frame.size.width, self.view.frame.size.height) textContainer:textContainer];
[self.view addSubview:textView];

//设置需要处理的文本片段
self.textStorage.tokens = @{ @"Alice" : @{ NSForegroundColorAttributeName : [UIColor redColor] },
                             @"once" : @{ NSForegroundColorAttributeName : [UIColor greenColor] },
                             TKDDefaultTokenName : @{ NSForegroundColorAttributeName : [UIColor blackColor],NSFontAttributeName:[UIFont fontWithName:@"Helvetica" size:18.] } };
Demo4:FontType
UIFontDescriptor的简单使用。
UIFontDescriptor* fontDescriptor = [UIFontDescriptor preferredFontDescriptorWithTextStyle:UIFontTextStyleBody];
UIFontDescriptor* boldFontDescriptor = [fontDescriptor fontDescriptorWithSymbolicTraits:UIFontDescriptorTraitBold];
UIFont* boldFont = [UIFont fontWithDescriptor:boldFontDescriptor size:0.0];
总结
通过几个例子,TextKit已经初步展示了它强大的处理能力,但这只是冰山一角。在WWDC的视频中关于自动布局、更加精细的排版方面例子,Demo中并没有实现。
参考资料:
WWDC2013视频: https://developer.apple.com/wwdc/videos/
Session 210: Introducing Text Kit
Session 223: Using Fonts with Text Kit
Session 220: Advanced Text Layouts and Effects with Text Kit
WWDC 2013 sample code: https://developer.apple.com/downloads/index.action?name=WWDC%202013
objc.io原文地址: http://www.objc.io/issue-5/getting-to-know-textkit.html